It's 3 a.m. You feel as if you've been staring at a blindingly bright screen for hours on end (because you have been), and you think the amount of shaking you're doing is from the caffeine and not a nervous breakdown, but you can't really be sure anymore.
How are my references still not in alphabetical order? Why is this equation different from the other one when I just copied and pasted it? How did Word take my misspelling of gathered and turn it into goatherd without me noticing? Why won't this bullet point JUST GO WHERE I WANT IT TO GO?
Fighting with a soon-to-be overdue paper is hassle enough. You brainstormed, you outlined, you wrote a first draft, you edited it twice, you proofread it (or—who are we kidding?—you just sat down to write your paper two hours before it was due). And now it's no longer the paper that's giving you grief but a finicky software program.
Before we start badmouthing our good friend Microsoft Word, let's take a deep breath, shall we?
Ahh . . . much better.
There are a number of features in Microsoft Word 2013 that I didn't know about until I started working at Scribendi, and they would have been useful when I was a student. Not only have I dealt with your plight, but I have also been through the fire, and I have burned brighter for it. For I come bearing not tales of sorrow but, instead, tales of triumph! I have earned the solutions to your problems on my epic quest to solve the Rubik's Cube that is Microsoft Word.
Think of Microsoft Word as that reserved person in your class or at a party. Sure, such people are difficult to figure out at first, and they may even be a little standoffish, but they mean well. The features of Microsoft Word may be a little hidden, but they are more than worth familiarizing yourself with. Anyone who has gotten to know Reticent Ryan or Unapproachable Ursula knows that they're worth getting to know.
So long as you heed our Microsoft Word tips, you'll see that there's a shining personality underneath that serious demeanor. It's time to click beneath the surface as Scribendi reviews the hidden features of Microsoft Word. Venture forth!
1. Generate a consistently formatted table of contents.
Let's start off with your table of contents. Tables of contents are created in Word by applying styles to certain pieces of text using the Styles menu. Look at the image below.

By applying Heading 1, Heading 2, Heading 3, and so on to various pieces of text, you are essentially giving Word directions for what to include in the table of contents for that document. So, to create a table of contents so fancy it'll knock your professor off his or her feet, we just need to follow a few simple steps.
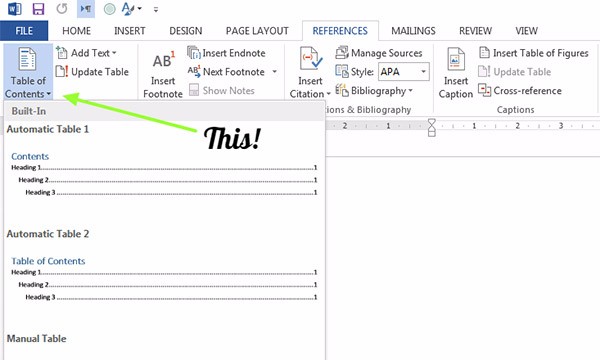
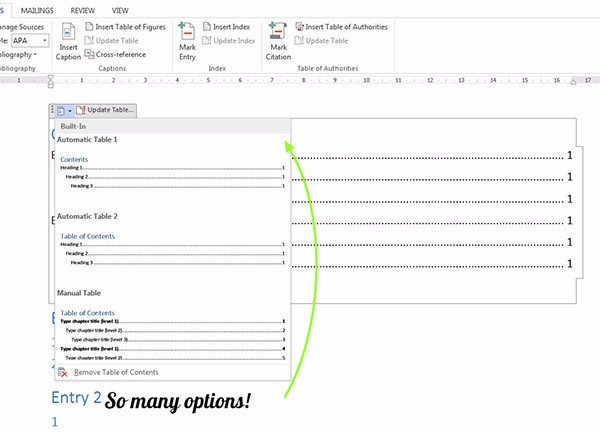
Move to the point in the document where you want to insert a table of contents. When your cursor is exactly where you want the table of contents to begin, go to the References tab and click Table of Contents. This will bring up a drop-down menu. On that drop-down menu, click Insert Table of Contents. See the picture below. So far, it's pretty straightforward, right?
After clicking Insert Table of Contents, a new window will open, and you will be able to format your table of contents as you see fit. Look at the following picture. You can see that Word allows you to choose the tab leader (a series of dots, a series of hyphens, a solid line, or a blank space) that runs from the entry to the page number in the table. It also allows you to select whether the numbers are right-aligned or appear next to the entries, how many heading levels you want to display in the table of contents, whether the entries are hyperlinked, and how the entire table is formatted.
I can only imagine the look on my professors' faces had I known such a fancy trick back in my day.
2. Automatically alphabetize your References list.
When faced with a monster of a References list that includes the 50 references required by your monster of a professor, correctly formatting it can be the absolute worst part of writing a paper. While Word can't create your References list for you (it's not magical), it can at least put your References list in the right order once you're finished. Who wouldn't like a helping hand, no matter how tiny? (Like a little raccoon hand or something? Aww. So cute.)
First, though, you have to make sure everything is formatted consistently. Look at the following list.
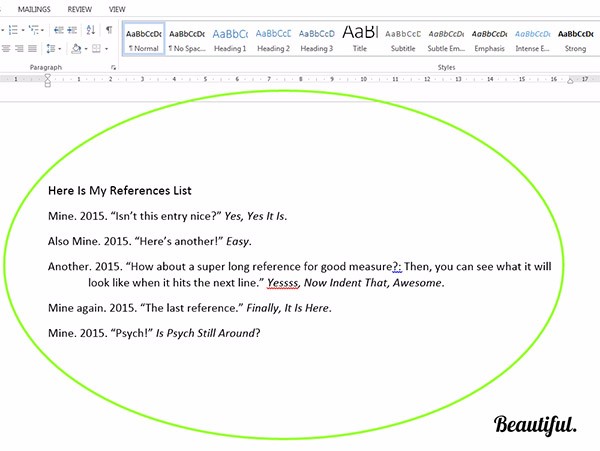
There is only one paragraph break between each entry, each entry has a hanging indent, and the option for Word to create a space after each paragraph has been turned on. It's not necessary for that option to be selected. We've done that here only to make it easier to see what's going on. The only thing left is to alphabetize the list.
First, select only the text of the bibliography. Then, go to the Home tab. In the Paragraph section, you'll see a small icon like the one in the green circle in the following image.
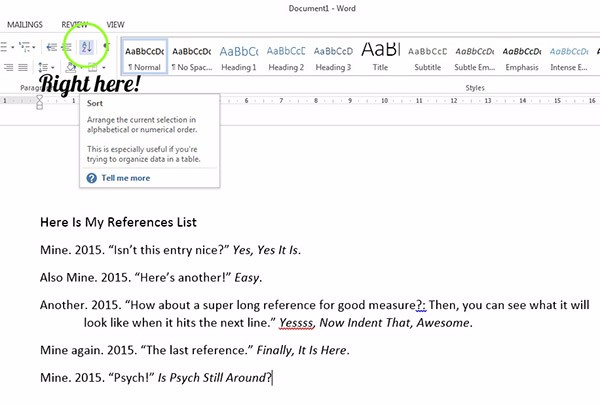
Click that button. It will bring up a new window.
The option to sort by paragraph will already be selected. All you need to do is click OK. Your References list will magically alphabetize itself. Presto! At least we can have a little magic.
3. Reduce visual clutter to eliminate distractions.
If you're like me, it's difficult to stay on task while writing an essay (or doing anything remotely productive). There's a whole world out there to explore, and you're stuck at a desk typing away. In today's world, though, you can even be distracted while sitting down. While Microsoft Word won't slap you every time you text a friend or like a photo, it can help remove some distractions.
Distraction-free reading helps to reduce visual clutter. Press Ctrl + F1 to toggle the top ribbon from view. Isn't that already more peaceful? Now, if you press ALT + W + F simultaneously, you can go right into Read Mode, which is super handy for catching mistakes you've missed while you were tweeting instead of working on your paper. It's okay; it happens to the best of us. To exit Read Mode, press AL + W + E or select View > Edit Document.
4. Effortlessly convert tables into graphs.
Here's another beautiful time-saver that will allow you to spend more time perfecting the introduction to your paper (or, you know, playing with your cat). First, select your table, then click Insert on the ribbon in Word. You'll then want to click the Object tab in the Text group and open the Object dialog box. Still following? Here's a picture in case you're lost.
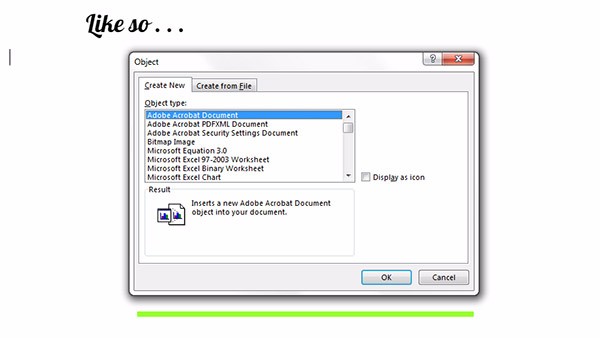
Perfect! Now, under Object type, select Microsoft Graph Chart, and then click OK. Super simple! Now go tell your cat that I love him or her. (It's part of the process, and it's very important.)
5. Write consistently accurate equations, every time.
This is one of the easiest Microsoft Word tips, but it's a handy one. Nobody's got time to type out that huge equation every time. Instead, choose Insert in the ribbon, then click Equation under Symbols. Click Insert New Equation to design your own equations, which can be quickly and easily copied throughout the paper. Even better, you can click well-known equations like, apparently, the Area of Circle or the Taylor Expansion. (Is that, like, the deluxe edition of Taylor Swift's "1989"? Disclaimer: I don't know anything about math. Still, pretty neat!)
6. Make group decisions while editing a single document.
Nobody likes group projects. Don't lie to yourself. Even when you like the people in your group, agreeing on anything is an absolute nightmare. Does it matter whether you insert the photo at the left or in the center of the document? Not really. Will you all fight about it anyway? Probably. It's human nature. Make multiple people focus on a single task and it won't be long until everyone's running off into Mirkwood, Gandalf's warning to NOT STRAY FROM THE PATH left behind in the wind. (Come on, people, you had one job.)
Anyway.
You've got five people leaning over your shoulder and one Word document. What's a frustrated soul to do?
Well, once you have a first draft, you can all do passes through the document to make edits. If you each track your changes, then the next person can choose to accept or reject them, and then the next person can do the same, and so on. At the same time, you can make and reply to comments right in the document.
To do this, you have to first tell Word to Track Changes. Click the Review tab, and then click Track Changes. Press Ctrl + Shift + E. Doing this will tell Word to turn Track Changes on. Then you can make your changes and send the document along to the next person.
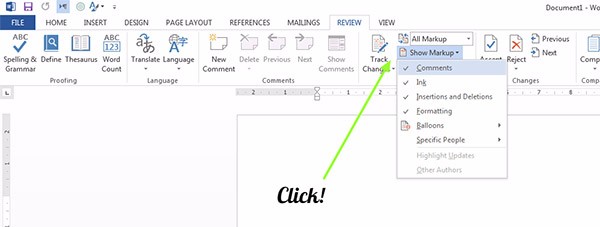
To tell Word to display the changes that will be made during the editing pass, the editor should go to the Review tab and click Show Markup. A drop-down menu will appear. It is important to ensure that the option Insertions and Deletions is checked. If it is not, then the editor won't be able to see the changes he or she has made.
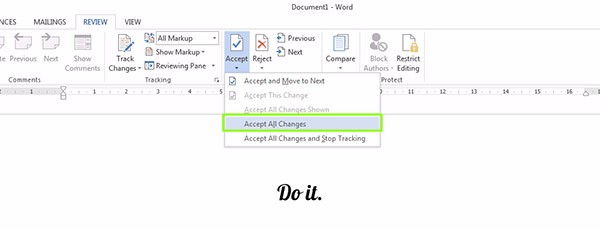
Then you can accept or reject changes. First, you have to go to the Review tab. Under the Review tab, there are two buttons: Accept and Reject. Beneath each button, you will see an arrow pointing down. If you click that arrow, you will be presented with four options. The two most important options are whether to accept or reject changes individually or for the entire document.
Here are the steps for inserting a comment:
- Make sure that the word/phrase you want to comment on is highlighted.
- Click the Review tab in the ribbon. In the Review tab, there is a New Comment button. Click the button.
- A comment box will appear. Type in your comment.
- Make sure to save the file you are working on once you've finished typing your comment.
If you want to delete the comment you've just inserted, click on the comment, right-click, and select Delete. Or you can select Delete from the Review menu in the ribbon.
Remember that you can also reply directly to comments. Don't let this get too out of hand, though. Eventually, the picture will just have to go wherever the last person sticks it, and we're just going to have to be okay with that. Long text arguments in the comments should be avoided—unless it's really important, like whether the book or the movie was better. (Hint: It's always the book.)
7. Avoid embarrassing mistakes.
This hack will help you avoid typos that result in words that could be considered offensive or insulting.
You wouldn't want to have to send a professor a panicked email after realizing that you accidentally used the word pubic instead of public. While this would be okay in an anatomy essay, it should be avoided in an essay on policy change analysis.
Luckily, this situation can be avoided entirely. You can create an exclude dictionary right in Word. Anything in your exclude dictionary will automatically be marked as misspelled every time that word occurs (even if the word is spelled correctly according to a normal dictionary). No more incorrect usage of the word pubic!
First, click on the File tab and choose Options. This will bring up another window. If you select Proofing in the column on the left, you'll see a button that says Custom Dictionaries. Click that button.
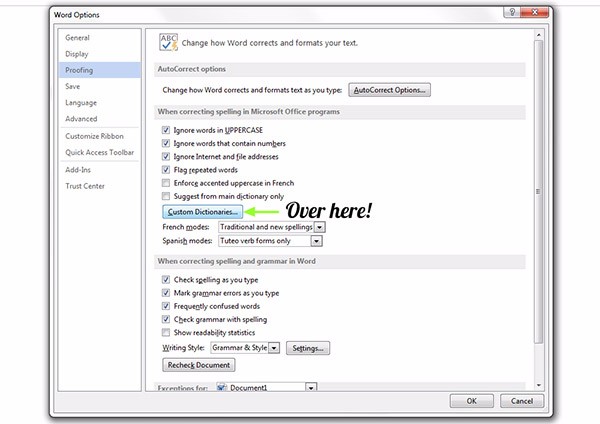
The window that opens provides you with a file path. This will be the path you'll use to find your exclude dictionaries. Click inside that field, copy the text, and paste it directly into the navigation bar of any folder on your computer. You will automatically be taken to the final file folder listed in the file path.
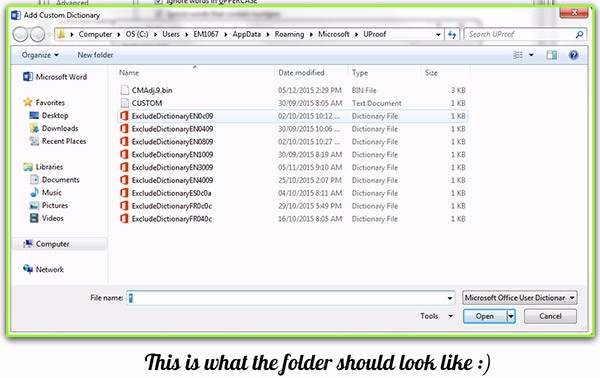
Once the appropriate folder is open, you will see a number of files already in this folder. The exclude lists should be obvious, as they are eponymously named. However, it is impossible to tell which variety of English they belong to without a little help. We've identified four of them for you, as these are the most commonly used varieties of English. A simple Google search will help you identify other dictionaries for other varieties of English or other languages.
- Australian English – ExcludeDictionaryEN0C09.lex
- Canadian English – ExcludeDictionaryEN1009.lex
- British English – ExcludeDictionaryEN0809.lex
- American English – ExcludeDictionaryEN0409.lex
Here's what the folder should look like:
Next you need to prepare your exclude list. Select whichever exclude list you would like to start with, and open the file with Notepad or another similar text-editing program. Do not open these files in Word or a similar word-processing program, as these programs impose their own formatting on documents. After opening the file, you should be met with a blank document.
Now you can begin typing your list of words. While some of the words you'll want to add to this list should be obvious, we need to point out a few things you might not have thought of. For example, to exclude all versions of a word that could be considered offensive, you will need to include all those versions in your exclude list. If a particular curse word can take on different endings, you'll need to include each version of that word.
We'll let you use your imagination on this one.
8. Enable your inner lazy person.
We all have one. They come out at the worst times—when you have a paper due, when it's garbage day, when that horrible sitcom comes on the TV and your remote is easily a foot away.
Don't feel bad. Actually, a lot of the time, lazy people are smart. How do you think the automobile was invented? Some guy didn't want to walk to work in the snow (probably)! Or how about the nifty nabber claw grabber? Getting up to change the channel is for chumps.
Well, Word will also let you be lazy. You just have to set up some macros.
At the fundamental level, macros are mini-programs Word executes on a file. Generally speaking, macros can be used to do anything. Most people use them to perform frequent, complicated tasks, such as cleaning up and formatting documents. (If only it could clean your room, too . . .)
For example, a user might build a macro that searches for and capitalizes the first word of every sentence in a document, or a macro that automatically sets the margins, styles, and tabs in a new document. The possibilities are endless.
The easiest way to create a macro is to "record" one. In the View tab, click Macros. A drop-down menu will appear, along with the option to record a macro. Click the Record Macro button. A new window will appear, allowing you to name your macro, choose where your macro is stored, assign your macro to a button in the Quick Access Toolbar or to a hot key, and give your macro a brief description. When choosing where to store your macros, I suggest storing them in the Normal.dotm file. This makes them readily available for easy editing, and the macros will be available in all documents.
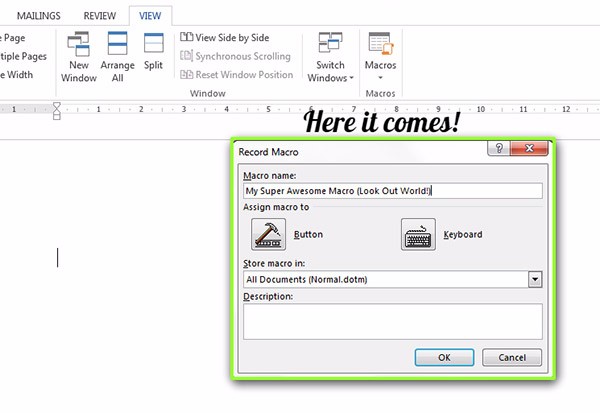
After you click OK, Word will begin recording the macro. You can perform the action you want Word to accomplish on its own (just this once, promise), then click the View tab, click Macros, and then click Stop Recording.
Now when you go to the View tab, click Macros, and click View Macros, a new window will appear, and you can select the macro you created and click Run. If you've done everything correctly, Word should perform your action all on its own.
If that's still too much work, there are many, many macros that have already been created that can be located with a simple Google search. Pretty cool, right?
9. Get rid of those annoying little red (or blue) squiggly lines.
The spell checker in Word isn't perfect; there are many words it simply doesn't know. This can be a problem when editing any document, but it's an even bigger problem when editing a technical or academic document. Your document may be filled with red squiggly lines before you even start, but these words are not spelled incorrectly at all. There are a couple of different ways to handle this problem.
There are free, commercially available open-source dictionaries (and paid dictionaries) out there for various fields (e.g., the medical, legal, and engineering fields). If you write or edit many medical documents, for example, it may be worth downloading and installing a medical dictionary add-on for Word, or you can subscribe to and download a dictionary that Word uses when running spell check. These types of dictionaries contain specialized terms and save time because you don't have to research the spelling for terms Word incorrectly identifies as misspelled.
After you have downloaded your custom dictionary, you'll need to move it to the correct folder before adding it to Word. Copy your custom dictionary file ending in .dic to the folder with the following title:
- C:\Users\[Username]\AppData\Roaming\Microsoft\UProof
It should look something like this:
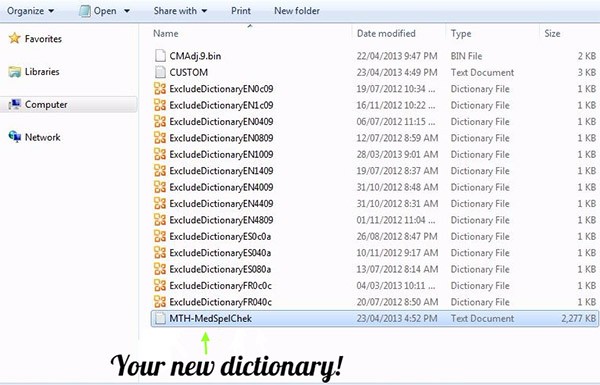
The green arrow is pointing to the .dic file we are using for this example. After transferring the file to the correct folder, you need to tell Word to access that dictionary when checking the spelling of a document.
Go to the File tab and click Options. A new window will open. Click Proofing and then Custom Dictionaries. A new window will pop up.
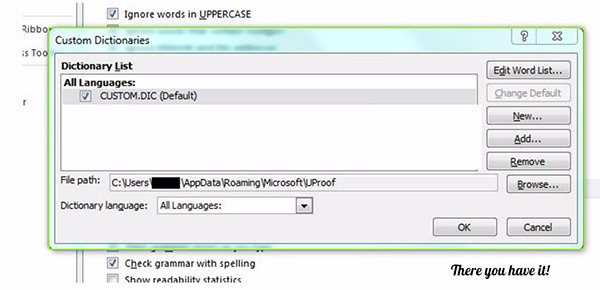
Click Add. A window leading to the file folder containing your .dic file will open. Select the dictionary of your choice and click Open.
Check to make sure your new custom dictionary has been added and that's it. Squiggly lines be gone!
10. Stop using the same words over and over and over and over again.
You've typed the word however so many times that you don't know how you haven't worn down those keyboard buttons. Imagine how your professor feels.
Not to fret! Word has a Find option that will allow you to see just how many times you began a sentence with however (or therefore or other overused words and phrases).
Simply complete the following steps:
- Click the Home tab. Click Replace in the Editing group.
- In the Find What box, type the term you want to find.
- Word will show you just how many results there are for that particular word.
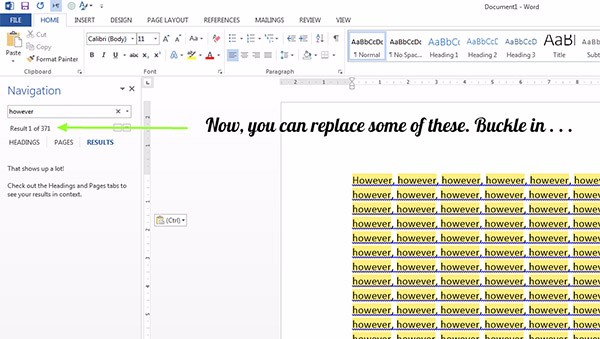
Once you've seen all of the instances of the word, you can begin to restructure those sentences or replace some uses of the word with synonyms. You can use the thesaurus tool by right-clicking the words and choosing the appropriate synonym. But be careful! Please make sure you've used the correct word. The last thing you want to do is disappoint Inigo Montoya.
Conclusion
It's been a long journey, but we hope you're able to take our Microsoft Word tips and use them to their greatest advantage. Whether it's organizing your References list, saving you from eyestrain, or keeping you on the right track, the good old features of Microsoft Word can launch you to greatness. (Or, you know, at least allow you to finally finish your essay. Baby steps.)


